![Building a 737-800 Homecockpit [OE-LNJ]](https://737cockpit.info/wp-content/files/2016/05/Header_6.jpg)
Updated the arcticle on 6.12.2011.
Yesterday I have picked up my newest addition from the Fedex Base on the airport.
My ACARS printer has arrivied 🙂

I started connecting the printer to my PFD machine as well as the power to my ATX power supply (5v).
I have installed the printer drivers to the Windows 7 32 bit machine and started a testprint (video will follow). And it worked. Some letters are hard to read, but thats because the 5V is maybe too low. Another cockpitbuilder connected the same device to 7V and the printing experience was better, so I will try this during the next days.
You need to connect only the +12V and +5V to the printer and therefore you will operate the printer with +7V. – as you can find it here. <– That won’t work for the USB printer version. You will need a seperate Power Supply which is capable of 7.5 – 8.5V and 15W. All other won’t work correct.
After I have bought and connected a sperate power supply the test printing was very fine 🙂

Than I ran into a new issue. I knew that there are only 32bit drivers available, but my main FS machine is operating a 64bit OS from Windows 7. I tried to connect via network share to the 32bit machine, but it won’t work, because I need the missing 64bit drivers.
So I started a research and found that the newest version from pdfcreator is capable of running a server mode, which means the 64bit machine will print to a PDF printer share from pdfcreator. The program will generate a local .pdf file and reprints this again to the local installed thermal printer. I haven’t tried this right now, but it should work, in theory 😉 <– it’s working. You will see a photo pf metar for LOWS printed from Win64bit machine.

Detailed instructions on getting the printer working you will be able to find it here.
Read the full article for a detailed configuration of PDFCreator.
Today I have tried the PDFCreator idea. And finally I got it working.
The configuration is very simple. Download the PDFCreator
Download and install FoxitReader (won’t work correct with Adobe Acrobat Reader)
Install FoxitReader.
Install PDFCreator as Server version
Share the created PDFCreator printer in the network.
Make the following configuration in the AutoSave mode:

Create a .cmd file (with notepad) and enter the following:
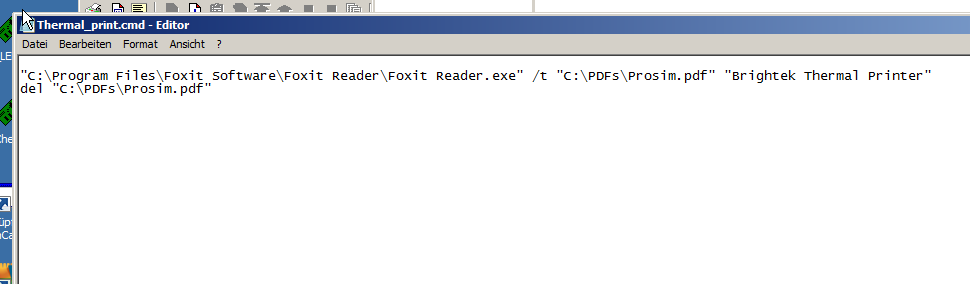
Save the .cmd file.
Back in PDFCreator select the menue “Actions” and configure the created .cmd file as action after printing.
Note – the window style can be set to Hidden.

Hit save.
Install the Brightek E19 printer to this 32Bit machine and configure the paper as WH-80 paper size and the feed to manual instead of automatic source.
Now go to your 64Bit machine.
Connect to the previous shared PDFCreator printer.
Change the following setting there:

Than print a testdocument from Notepad etc.
The 64bit machine will send the printjob to the 32bit machine via the networkprinter. There it gets generated to a PDF File. Once done the .cmd script will pick up the file and print it via FoxitReader. After the printjob was sent to the printer the file gets deleted.
That’s all 🙂
A Video will follow during the next days.